

Planning, shooting, and sharing a video in just two hours sounds ambitious, but as Wistia’s Director of Production, I’m here to tell you it’s possible!
The secret? Start with low-hanging fruit: a video that answers one question your customers ask again and again. It doesn’t need a big budget or a polished set; just a person providing a clear answer on camera. It won’t go viral, but it’ll pull its weight.
A one-minute FAQ video we made at Wistia has logged 18 hours of watch time. That’s 18 hours of users getting answers on the spot, and 18 hours our support team didn’t spend repeating themselves. And that one video doesn’t stop at support. It can double as social content, live in your help center, and get sent along by sales after a discovery call.
I recently sat down with James Sandbrook, Co-founder of The Marketing Meetup, to walk through making an FAQ video from start to finish in a couple of hours. It comes down to just six steps.
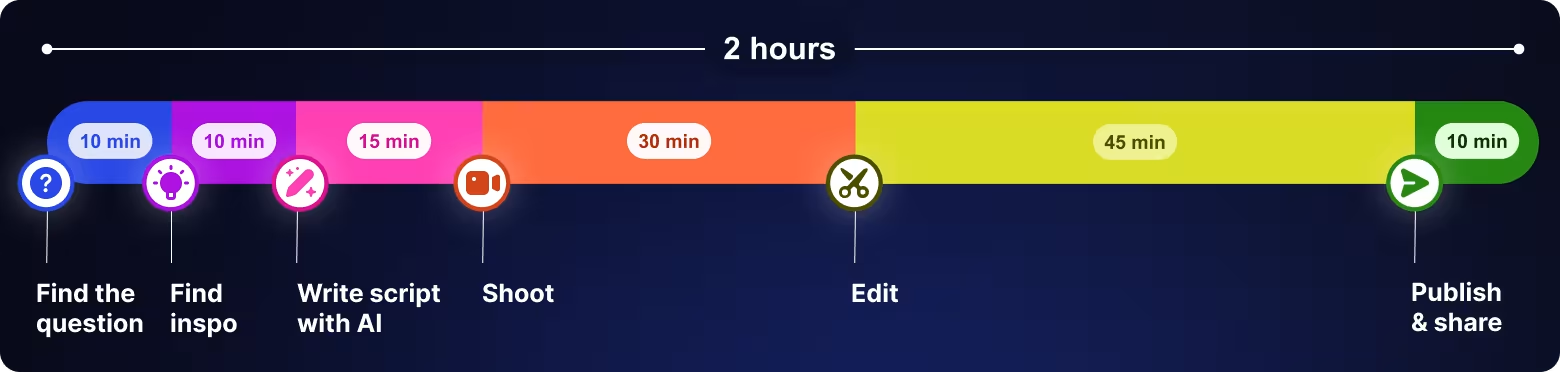
Step 1: Find the question (~10 minutes)
Ping your support team and ask what questions they’re sick of answering.
Step 2: Find video inspiration (~10 minutes)
My go-to for inspiration is watching music videos on Apple Music. My YouTube algorithm is also dialed in with the perfect amount of cooking videos and Jurassic Park lore. But I won’t just rip off the things I find visually compelling. I’ll think about the interplay between a talking head and how text appears on screen, as well as the pacing in a video.
Step 3: Write the script with AI (~15 minutes)
When it comes to using AI for help writing a script, you’re much better off building a custom skill than prompting, “write me a script about X.” A prompt that vague is guaranteed to get you something generic and lackluster.
To build a custom skill in your favorite AI tool, pull together scripts you’ve written in the past for well-performing videos, paste them into the skill, and add notes about what makes your brand voice distinct, like your tone and preferences. Here’s the skill I created if you need some inspo.
After you create a skill, the scripts you generate will be 90–95% of the way there with minimal cleanup needed. You can drop in chicken-scratch notes or a rough brief and get a better, on-brand script back almost instantly.
Step 4: Shoot (~30 minutes)
Here are my tips for the gear you need (and might already have) and how to set up a good shot:
Camera
iPhones are powerful cameras and perfect for recording talking heads. They’re also better than most built-in webcams. With a Belkin MagSafe laptop mount (~$30), you can clip your iPhone directly to your laptop screen and use it as a webcam via Apple’s Continuity Camera.
If you need to record your screen, Wistia’s webcam and screen recorder can help you pull off smooth transitions between talking head shots and product walkthroughs.
Audio
In my opinion, your audio matters more than video quality. If you’re going to invest in one piece of gear, make it a microphone.
The HOLLYLAND - LARK M2 DUO 2-Person Wireless Microphone is excellent and requires zero setup for under $80. The Elgato Wave:3 MK.2 USB-C Microphone (under $200) is great for desk setups where you don’t want a mic in frame.
Lighting
All you really need to do is face a window. Natural light from the front is soft, flattering, and free. If your window is behind you, move to avoid appearing dark and shadowy.
Framing
The key to framing is to get your camera at eye level. If you’re on a laptop, put it on a stack of books to raise it to the appropriate height.
Step 5: Edit (~45 minutes)
The editing stage is where most people get stuck, and you’ll spend more time here than in any other step. But it can be a breeze if you’re using the right tool!
A few tool recommendations:
- CapCut is free, web-based, and approachable.
- If you already have Adobe Creative Cloud, Premiere has a steeper learning curve but plenty of free tutorials to get you from zero to competent quickly.
- Wistia’s Remix editor is agentic, so you can drag in a recording and prompt it like a chat: “make this into a 2-minute video,” “cut the ums,” “add captions,” “make this vertical.” It won’t generate an AI avatar of you, but it will edit what you’ve actually shot.
A few editing tips:
- Punch in on your talking head (cut from a wide shot to a close-up) to create visual variety.
- Burn in captions, especially for stats and key phrases.
- Lead with your best moment, not your intro. If a great line happens at the 2-minute mark, pull it to the top as a hook, then cut to the beginning.
Step 6: Publish and share (~10 minutes)
First, make sure your video has a good thumbnail! We’ve found that videos featuring someone’s face on the thumbnail drive higher play rates than videos with product shot thumbnails.
Finally, get the video out of the door. Hand it to support for ticket replies, sales for after discovery calls, and social to share with followers.
You’ve got this!
I hope this workflow helps you start making more impactful videos. Everything gets easier the more you repeat a process. So block off two hours on your calendar and give this a go!
Shoot, edit, publish, and share in Wistia
Try out this workflow with a tool that can do a big chunk of the work all in one place.
Let’s go →