How to Make Your Webinars Accessible to Everyone
July 22, 2025
Topic tags
Want to know the secret to hosting better webinars? Provide an inclusive experience.
It’s not just about making your webinars accessible to folks with disabilities. It’s also about helping anyone who’s dealing with noise, a language gap, different learning needs, or just busted speakers.
Let’s talk about all the different ways to make your webinars easier for everyone to follow and enjoy!
Before the webinar
During the webinar
After the webinar
All-in-one Video Platform
Streamline Your Webinar Process
Before the webinar
Choose a platform with built-in accessibility features
You can go a long way with the right webinar platform. You want one that offers and supports these accessibility tools:
- Live closed captioning: A feature that automatically displays spoken words as text on the screen in real time
- Keyboard accessibility: Functions (links, buttons, forms, and other controls) that can be operated with only a keyboard
- Screen reader support: Compatibility with software applications that convert digital text into synthesized speech
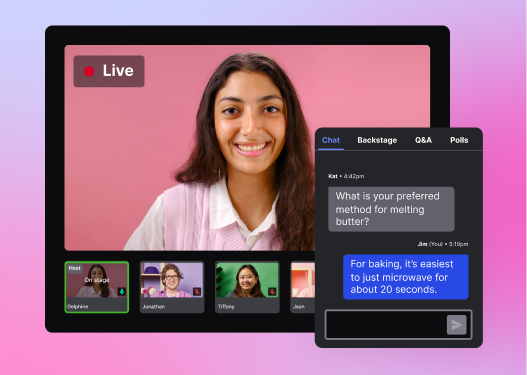
- Chat functionality: A feature that allows hosts, panelists, and attendees to have text-based conversations with each other during the event
Wistia has all those tools and some more
We made sure our webinar feature is fully compliant with level AA of the latest Web Content Accessibility Guidelines (WCAG), but we didn’t stop there.
We’ve also added thoughtful touches to our accessibility features. For example, we made sure your audience can use their keyboard to access everything, including hidden elements like the reaction and “more options” buttons in the chat.
And when you’re customizing your event in the editor, we’ll show you A11Y recommendations to help keep your fonts, colors, and buttons easy to read and use.
Consider the presentation slide design and layout
You want to make sure your slides are easy to read and understand. We’ve got a few tips:
- Minimize the amount of text: Only include short bullet points and key takeaways in your slides. Some folks may find it difficult to read paragraphs of text while someone else is speaking.
- Use unique patterns or textures in your graphs: If you only use colors to show differences in your data, some people may have a hard time telling them apart. Mix in patterns like stripes or dots for better clarity.
- Use the same template in all of your slides or whenever possible: This will help limit cognitive load.
- Use high-contrast colors: Good contrast between the text and background colors (and in your graphs) make your content easier to follow. Note
- Avoid animations except to make information easier to understandSome people find movements pretty distracting or even nausea-inducing, so only use motions and animations when you need them to get your point across.
- Avoid blinking or flashing effects In the WCAG guidelines, you’d find a threshold of three flashes or below within a one-second period. It’s because flashing effects can cause seizures or other physical reactions. To stay on the safe side, avoid those effects altogether.
- Choose a simple font face with consistent thicknessThis type of font is easy for everyone to read.
Send the presentation slides to registrants ahead of time
This will be super helpful for anyone who needs some time to get familiar with your content before your webinar. When sharing, be sure to send the presentation in an editable format because some folks may need to translate key terms into their own language or adapt the slides (like changing the font size) to meet their needs. And those who rely on screen readers will need to be able to access the content because screen readers can’t pick up any text that’s presented via screen sharing.
You can find more information about this on Web Accessibility Initiative’s website.
Do a test run before the event
A test run will give you time to work out any technological kinks before the event. Be sure to pay attention to:
- Video quality
- Audio quality
- Accuracy of the live captions
- Legibility of your slides
- Background noises
- How visible and well-lit everyone’s face is
- Quality of any virtual backgrounds (i.e. make sure they’re not flickering)
During the webinar
Turn on captions
Some webinar platforms automatically turn on live captions, and others don’t. If your platform falls into the latter category, remember to enable captions before the presentation starts. When you’re hosting with Wistia, all you gotta do is jump into the event room and turn them on before going live.
Record the webinar
When you make a recording of your webinar available on demand, you can add features like audio descriptions and subtitles in other languages to make your event even more accessible. (More on this later!)
Plus, if some folks missed parts of your presentation or had difficulty keeping up with it, let your on-demand recording come to the rescue. They can use it to review the information at their own leisure.
All you have to do is record your webinar when you’re live. If you host your webinars with Wistia, they’re automatically recorded and saved to your account.
Speak clearly and slowly
This is the best way to make sure the captions — and your attendees! — pick up everything you’re saying. Be sure to use short and simple sentences unless you’re presenting to a niche audience that’s expected to understand more complex language.
You also want to avoid jargon, metaphors, and idioms that might be confusing to some of your audience members. And don’t forget to spell out any acronyms upon first use.
Verbally describe key content
To make sure every attendee can fully access the visual content, verbally explain what’s shown on the screen. That means describing any relevant images on your presentation slides and reading all key pieces of text out loud. If someone asks a question in the chat, read it out loud before answering it.
Invite your audience to contact you afterwards
Some of your attendees might have a hard time keeping up with the presentation and/or the chat threads, and some may not be able to type out their questions fast enough. Others may need more time to process the information provided during the webinar. These difficulties could hinder them from asking questions in real time.
By inviting your audience to contact you after the event, you’re giving them a chance to ask questions at their own pace and request clarification for anything they missed.
After the webinar
If you’re sharing your webinar on demand after it ends, take a few extra steps to make sure everyone can access and enjoy it.
Use an accessible video player
When your video player has accessibility tools built in, you’ll save so much time adding those features to your recording.
Look for one that offers:
- High-contrast player colors
- Closed captions
- Compatibility with keyboard and screen readers
- Alt text for thumbnails
- Visible player controls
- Audio descriptions
Wistia’s player has all of the above, plus an interactive accessibility checklist that helps you set up those features in just a few clicks.
Add captions
If you’re using a platform like Wistia, the captions you turned on during the live event will automatically carry over to the recording, along with a transcript. You can hop in and polish up the captions before sharing the recording. Forgot to turn on captions during your live event? Tsk tsk, but hey, it happens. The good news is that with Wistia, you can add captions to your recording in just a few clicks.
Include a descriptive transcript
A descriptive transcript includes not just the spoken words, but also key visual details, like when someone points to a chart or when a new slide appears. That extra context is super helpful for people using screen readers or anyone who prefers to read through the content. Wistia automatically creates a basic transcript for every video, so all you gotta do is jump in and edit the transcript to include visual details.
Captions vs. transcripts
Captions and transcripts are a dynamic duo, but they do different jobs. Captions show up on the video itself and include spoken words and sound effects. Transcripts live alongside the video and are screen reader–friendly, making it easy for folks to follow along or search through the content. Want to make your on-demand videos as accessible as possible? Include both.
Add audio description
Audio descriptions are spoken narrations that fill in the visual gaps, like scene changes, gestures, or on-screen text that isn’t covered in the original audio. They’re especially helpful for folks who can’t see what’s happening on screen. In Wistia, you can order standard or extended audio descriptions right from the Customize panel. It costs $8 per minute, and most orders are ready in about five days. Already have your own audio description file? You can upload that too.
Dub your on-demand video in multiple languages
You might not be able to speak every language during a live event, but your on-demand video can! With AI dubbing in Wistia, you can add high-quality voiceovers in multiple languages in just a few clicks.
It’s not just voiceovers, though. When a viewer switches to another language, elements like calls to action, chapters, and email forms automatically update to the language too.
Why you should host accessible webinars
Media accessibility laws
In some parts of the world, video accessibility isn’t just a best practice. It’s required by law. The European Accessibility Act, for example, requires businesses that serve customers in the EU to make their digital content accessible. That includes on-demand webinar recordings.
Accessibility benefits everyone
By making your webinars inclusive to everyone, you’re removing barriers and giving your audience full access to your content. That means they can:
- Fully understand your content
- Participate in discussions and Q&A
- Access resources in a way that meets their needs
Accessible webinars don’t just help your attendees. They also help your brand. When you make your events inclusive, you:
- Reach a wider audience and increase attendance
- Boost engagement and participation
- Strengthen your brand’s reputation as thoughtful and inclusive Basically, every attendee gets to enjoy your webinar content in its entirety without any barriers, and you set your business up for long-term success.
