
Note
In this video, Chris covers the basic fundamental principles of shooting with a Digital SLR camera. Specifically, he covers how to use the Wistia camera of choice, the Canon 5D Mark III.
Even if you’ve never touched a DSLR in your life, by the end of this video workshop you should be able to pick up a camera and shoot some great looking video footage–not too shabby, eh? While Chris covers the Canon 5D Mark III, many of these principles apply to mirrorless cameras and traditional video cameras as well.
What we'll cover:
- Choosing your software
- ISO
- Aperture
- Shutter Speed
- White balance and color temperature
- Recording audio
- Changing lenses
- Lens characteristics
- Shot setup and framing
DSLR cheat sheet
Full disclosure: the Canon 5D Mark III is not a video camera. It's actually a still camera that just happens to also capture video. But there are some incredible advantages to using this camera over a traditional video camera:
- It's small and really light.
- Its interchangeable lenses increase versatility and inspire artistic and creative shots.
- It's easy to produce a shot with a shallow depth of field (background out of focus).
- It's incredible in low light and variable lighting conditions.
Video settings: frame rate and aspect ratio
At Wistia, we shoot our videos at 24 frames per second to achieve a more cinematic and artistic look and feel to our footage. We record using the 1920/24/ALL-I setting. This produces the highest resolution and highest quality footage the camera can shoot. If you’d like to shoot at a higher frame rate (to produce slow-motion footage) look for the 1280/60/ALL-I setting. This will reduce the resolution to 1280x720, but will capture at 60 frames per second.
In an ideal world, deciding on your aspect ratio should be an early part of the creative process. As a general best practice, you should always consider what shape the final format will take before you start shooting. If you calculate the perfect dimensions for your video ahead of time, you’ll never have to worry about cropping out people’s heads (or your product!) or wasting space with black bars. Luckily, we’ve got a tool for that! Use our Aspect Ratio Calculator as part of your process. All you have to do is enter your video’s current or desired width, and we’ll give you the corresponding height (or vice versa) for the appropriate aspect ratio. Thanks to these exact calculations, your video will look its very best and your creative vision will remain intact!
For more help choosing the ideal aspect ratio for your video, check out this post. Additionally, we’ve dug into how Adobe Rush helps you get the perfect aspect ratio when you’re editing video on-the-go for social media. Whatever your questions about aspect ratio may be, we believe we have the answers.
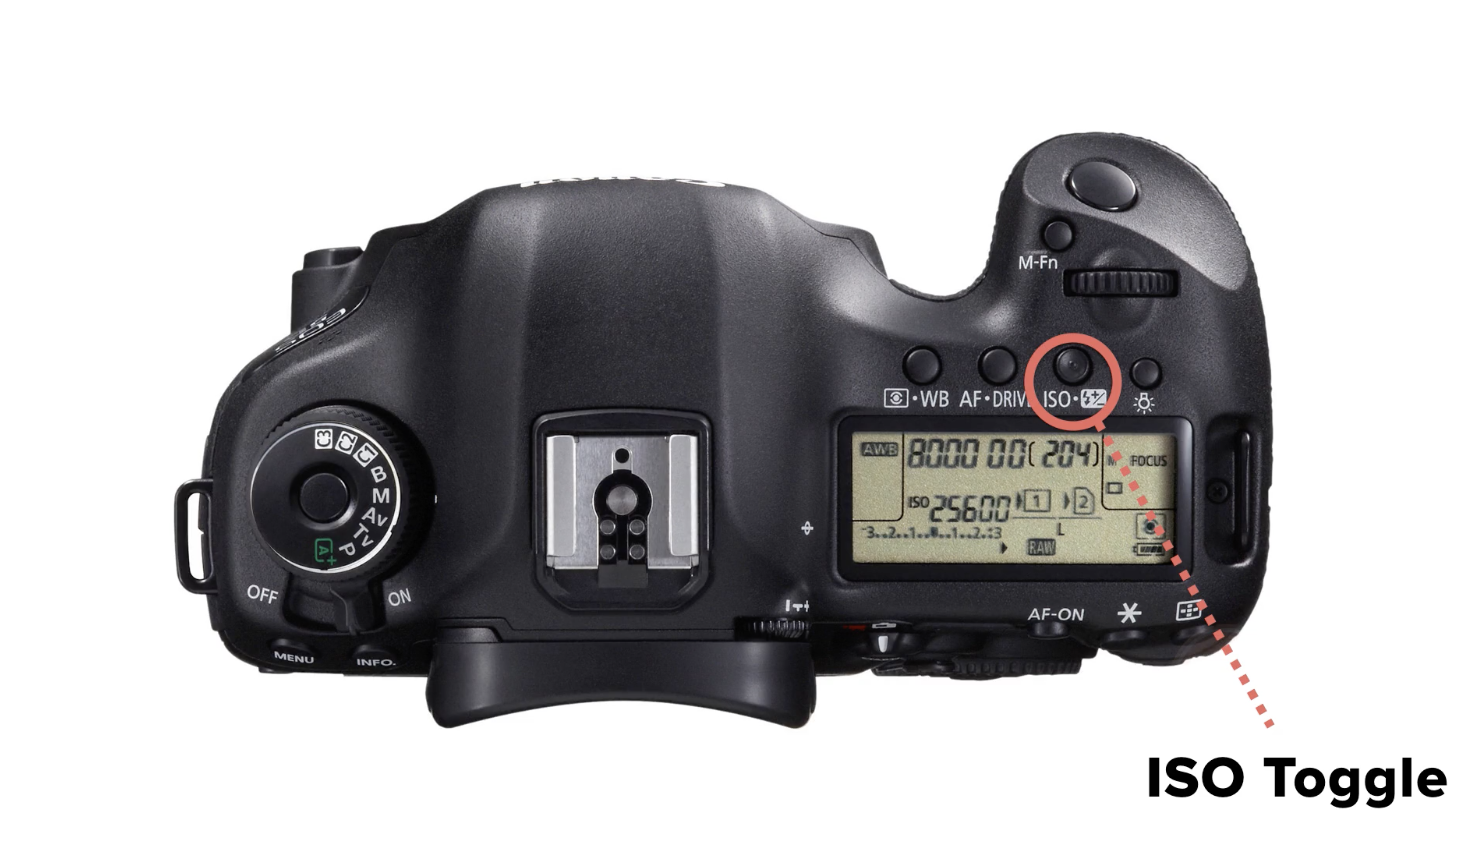
ISO
ISO determines how sensitive the camera is to light. In a nutshell, the higher the ISO, the brighter the image will be. The lower the number, the darker the image will be. Use a high ISO (greater than ISO 640) if you’re shooting inside without a ton of ambient light. Keep your ISO number low when you’re shooting in broad daylight outside or under bright studio lights.
The fact that you can raise and lower the ISO is really, really awesome. But as you raise the ISO, you introduce noise and grain to your picture, so you’ll want to do so carefully. The camera’s going to perform best at the lower end of the ISO range.
Aperture
Aperture controls the amount of light reaching the image sensor. A higher aperture (e.g., f16) means less light is entering the camera. This setting is better for when you want everything in your shot to be in focus — like when you’re shooting a group shot or a landscape. A lower aperture means more light is entering the camera, which is better for low-light scenarios. Plus, lower apertures create a nice depth of field, making the background blurry. You want to use a low aperture when you want a more dynamic shot. For example, we use low apertures like (f1.8) in our Wistia studio to create that classic shot.
When you’re setting up for a shot, keep this tip in mind:
- The higher the number, more of your shot will be in focus.
- The lower the number, less of your shot will be in focus.
Tip
Shutter speed
In photography, shutter speed has a pretty literal definition: It’s how fast the shutter opens and closes when you take a picture. When it comes to how shutter speed is measured, a lower shutter speed (e.g., 1/50) means the shutter is opening and closing at a slower rate. When your shutter is opening and closing at a slower rate, you’ll notice that your image will be bright, and fast-moving objects will be out of focus. A higher shutter speed (e.g., 1/1000) means the shutter is opening and closing at a fast rate. The outcome is that your image will be darker, and fast-moving objects will be crisp and in focus.
Now, when it comes to shutter speed for video, it’s relatively the same, but the shutter isn’t opening and closing. What actually happens is that the shutter stays open, and the sensor exposes for a certain period of time. When deciding your shutter speed for video, use this general rule: double your frame rate. If you’re shooting at 24fps, your shutter speed should be 1/48 (rounded up on the DSLR to 1/50). If you’re shooting at 60fps, your shutter speed should be 1/120.
Although that’s technically the rule, it’s not imperative to adhere to it. We suggest prioritizing aperture first, ISO second, and then the shutter. So make sure that you find the aperture that you want to use, adjust your ISO accordingly, and then wherever the shutter ends up should be good enough.
In this post, our video producer, Trevor, explains further that you can use any shutter speed you want when shooting a video. Think of shutter speed as a way to brighten or darken your video image. But beyond just that, you can achieve different looks with various shutter speeds for video. A lower shutter speed has a cinematic feel, and creates a more natural-looking motion blur. On the other hand, a higher shutter speed will feel jumpy. The choice is yours!
All-in-one Video Platform
Create, Edit, And Host Videos
Learn moreWhite balance and color temperature
Different light sources, like a light bulb and the sun, have very different temperatures. White balance quite literally tells your camera the color temperature of the light you’re shooting. Try to match the white balance preset to the color of light with which you’re shooting. For example, if you’re in broad daylight outside, look for the sun icon. If you’re shooting inside under white fluorescent lights, use the fluorescent bulb preset. If you’re shooting with traditional studio lights or halogen bulbs, look for the little tungsten bulb icon.
There are situations when you’ll be shooting with mixed light temperatures. At Wistia, when we’re shooting outside of the studio, we could have some light coming in from the windows, which is at around 5600 Kelvin, combined with some lights from our fluorescent lights, which are maybe around 4000 Kelvin or 3000 Kelvin. This mixture would give us a final color temperature of around 4800 Kelvin. In situations like this, look for the custom ’K' icon to dial in the temperature until the color in your shot looks natural.

When it comes to filming outside, we share some of the basics we’ve found helpful in this post. From detailing the benefits of reflectors and silks to reasons why you should pick up an ND filter, we can help you get that well-balanced shot you’re looking for.
Recording audio
The 5D Mark III's headphone jack allows you to confidently record audio on the camera by monitoring exactly how it sounds. If something gets distorted or you need to turn the microphone volume up or down, you'll know right away during the shoot.
This is a super speedy breakdown of the settings we use:
- Zoom H5 powering Sennheiser ME-66 shotgun microphone with phantom power enabled +48V
- H5 input volume dial is around 4-5
- Line out from H5
- 5D Mark III sound recording is on manual, dialed way down
- Record simultaneously on the H5 as a backup
- Monitor the 5D audio by plugging headphones into the camera
Audio quality on the 5d is good, but not perfect. I like to record on the H5 simultaneously, just in case I need to sync the good sound from the H5 with the bad sound from the camera. This general setup works with other DSLR cameras as well! But there is one giant downfall to using just about any other video-capable Canon DSLR (70D, 7D, 5D Mark II) besides the 5D Mark III: the lack of a headphone jack. We have a full 101 on recording audio with a Canon 5D Mark III here.
If you’re in need of more resources regarding improving your audio, look no further. We have a post about how to reduce echo in your video. You might even be in the market for a microphone to enhance your audio quality. This post covers all your bases in that case. Lastly, with the rise of video marketing, you may want to take a peek at this post about recording audio for business video.
Changing lenses
Why do you want to use different lenses? Well, let’s take a look at two lens examples. First, we have the 50mm f/1.8 STM lens. There are many advantages to using the 50 millimeter fixed prime lens. It has a low f-stop, which means it’s going to let more light in, resulting in better low-light performance. As you let more light in and open up that aperture, you get that nice cinematic shallow depth of field. In general, you can produce a better picture with a fixed lens, which means sharper images, quicker focusing speed, and way more potential to get artistic and blur the background.
The second lens we’ll look at is the Canon 24–105mm f/4 zoom lens. Now the advantage of a zoom lens, like this 24 to 105, is that it’s great for on-the-fly shooting. If you don’t know exactly what your shot’s going to look like, you can get multiple perspectives with the zoom lens all from one location.
A lens is an investment, so try before you buy. There are a bunch of rental houses that have awesome deals on lens rentals for the day, week, or even month. I’ve found it to be pretty helpful to rent a lens before committing to a purchase. And, for more tips on getting creative with DSLR lenses, head on over to this post and watch our super helpful video that will inspire new shots and interesting angles for your videos.
More resources for you
As more businesses harness the power of video marketing, knowing how to get the most out of your DSLR will benefit you in the long run. We have a plethora of posts that can teach you how to shoot video by yourself, shoot professional Instagram stories for your business, and even use a DSLR as a webcam. Our tips are there for the taking. So, don’t be afraid to get out there and experiment with new gear. You never know how a simple video can positively impact your business!
Get Into Show Business
Learn how to create binge-worthy episodic content with our 20-episode crash course. Watch for free!
Let’s go →